
tuesday -friday 9am to 6pm
saturday- 9am to 5pm
sunday & monday - closed
 |
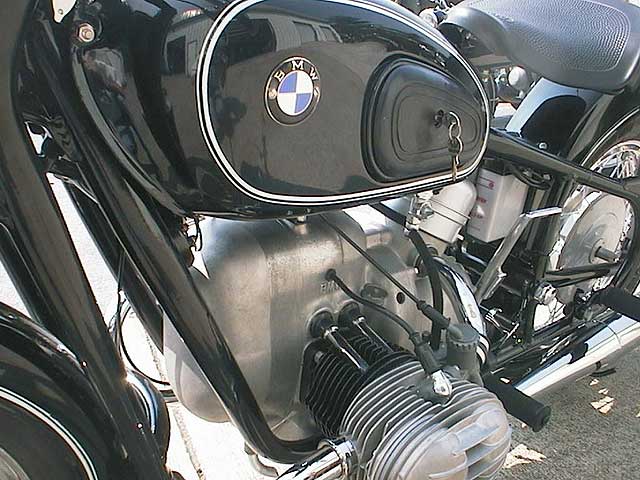
Meet Adam Hamel, Blue Moon Cycle's ace technician and our Virtual Restoration candidate BMW R60/2. Adam will be doing most of the work on this project and today we start with the tear down. We have chosen this R60/2 because it's just the way we like to get them for restoration. This bike is cosmetically challenged but very complete and original. The sheet medal is straight and only showing surface rust on its factory original paint job, and the engine has good compression. The numbers match so when its finished it will be worth more. | ||
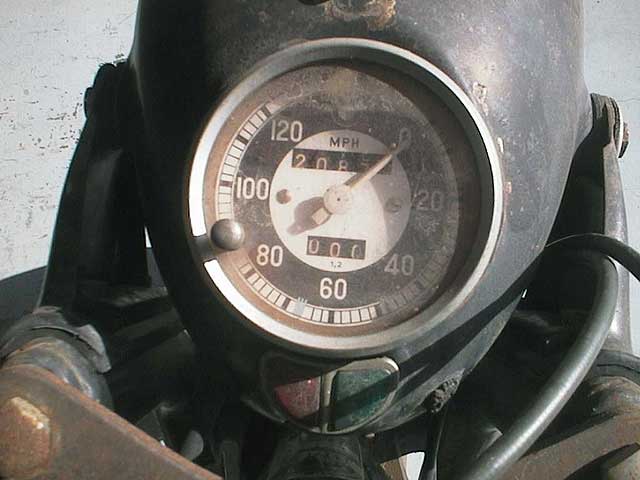 |
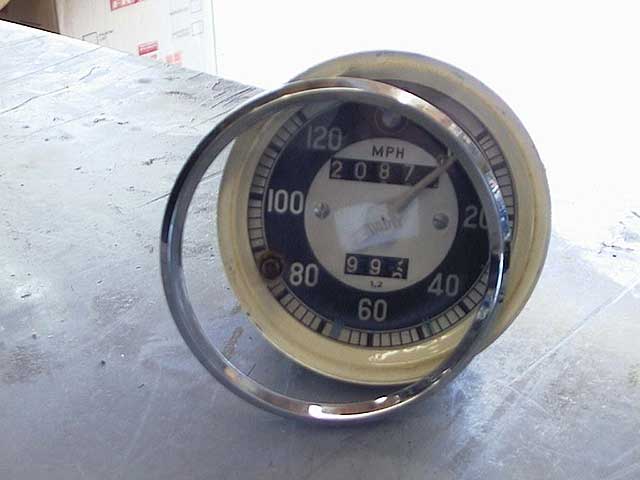
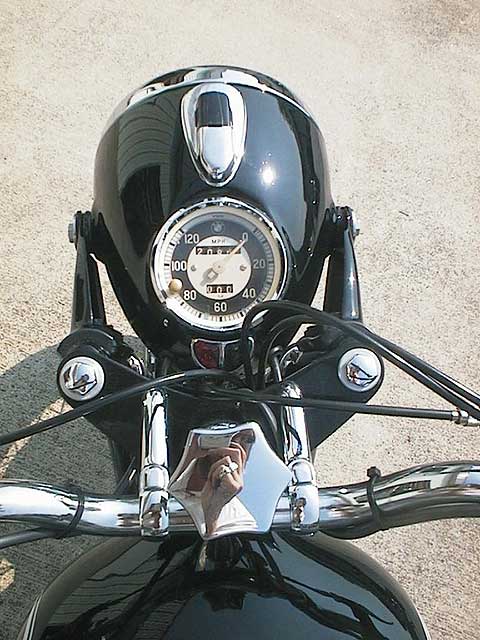
The speedo shows 20870 miles. Since the foot peg rubbers and kick start lever show very little wear we believe it could be all the miles this bike has seen. Once we get into the engine we'll know more; if the pistons are the standard 72mm size then the mileage is probably correct. The previous owners could have show a little more care for keeping the bike out of the weather. The speedo only needs a cleaning and lube. | ||
 |
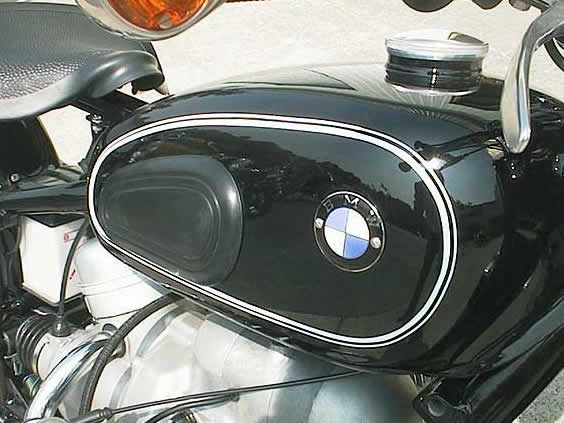
The standard 4 gallon gas tank has only slight dents and surface rust. The inside still has it's original red oxide coating in great shape. Even the porcelain emblem survives chip free. At first look this bike looks to be very rough, but when you look at the components separately you see its mostly paint and plating that brings it down. | ||
 |
The rear fender is rust free, straight, and not drilled with extra holes. The hinge area is often a problem and very difficult to repair. This fender is excellent, same goes for the tail light. Notice the rear shock adjusting handles, they haven't been cut as is often the case. Paint and plating is all that will be needed here. | ||
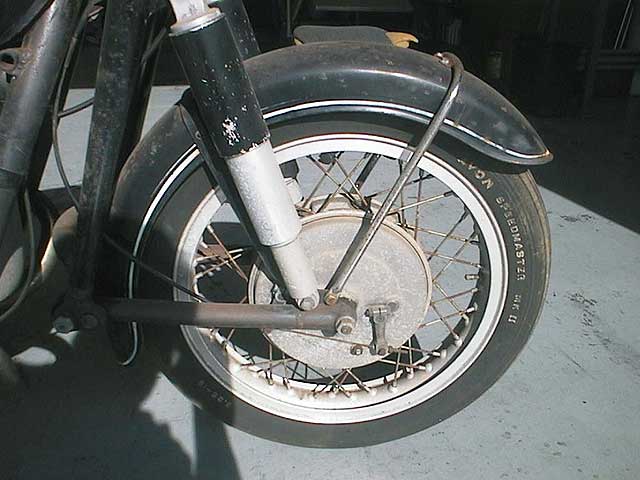 |
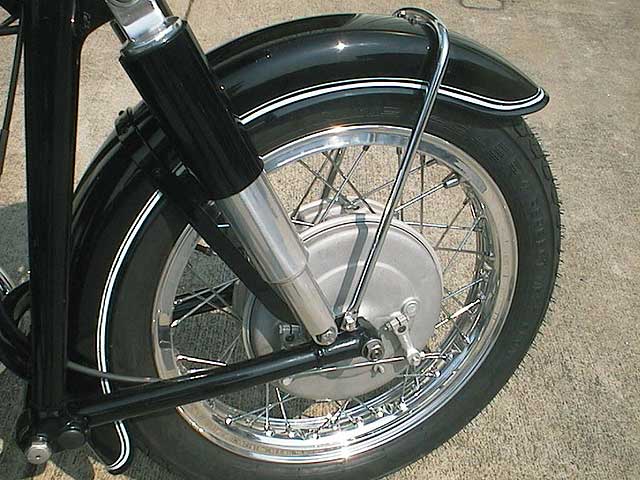
The front fender and shock covers are straight.This bike has never been in a crash, the alloy rim is only oxidized, sorry to say the Avon speed master has seen better days. | ||
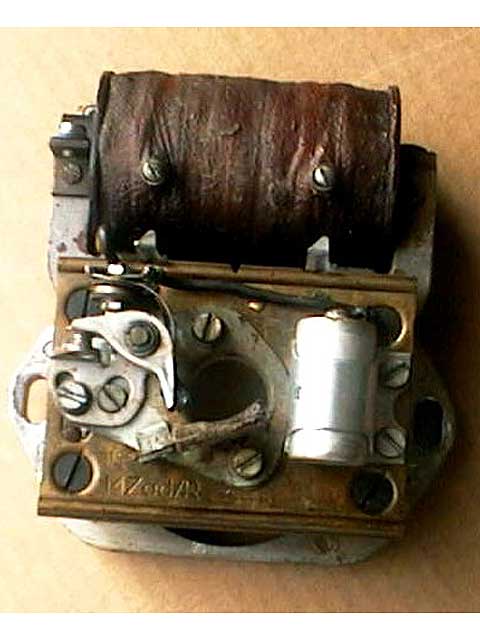 |
Here we have the /2 Bosch Magneto, although this one still works OK, it is our experience that its more a question of "when" than "if" the 40 year old coil will fail. The old coil feels soft and squishy, that means the lacquer insulation is breaking down. A bad coil will make the bike difficult to start, especially when hot. This is one item we will replace with a new one before it lets us down. | ||
 |
The oil pan was removed and as you can see the oil was old and sludgy. Good new is we don't see any metallic particles but its a good thing we didn't run the bike with this oil. Always remove the oil pan before riding a newly purchased old BMW. At the very least clean it. The /2's do not have oil filters, when we get to the slingers we will know if they are full of sludge. | ||
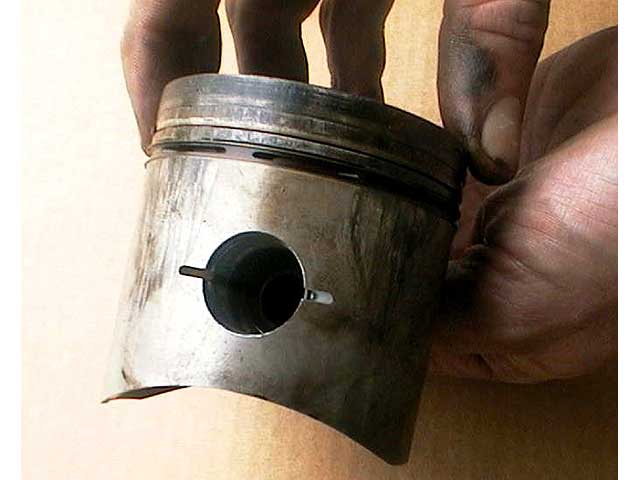 |
The pistons are still the original 71.95 MM size, that means this engine has never had an over bore. These pistons are scuffed pretty good on the sides and although they would probably work OK we will replace them with a new set of first oversize. | ||
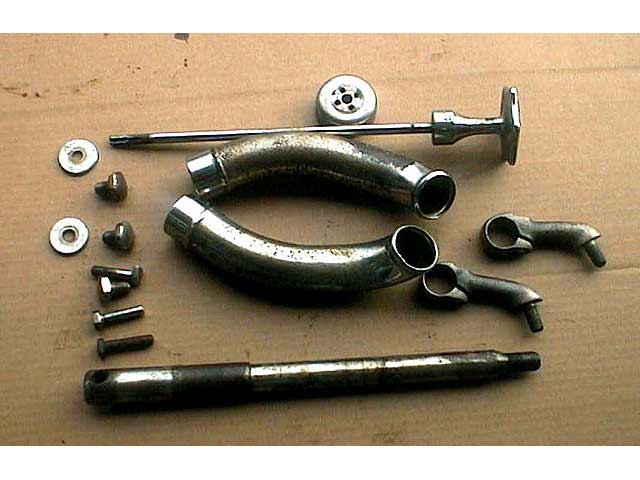 |
Since BMWs don't have a lot of chrome and the German chrome never was very good, these are the parts we will be reechoing. Its not cost effective to rechrome some items such as exhaust pipes, mufflers, wheel rims and fender braces. For parts like these its advisable to simply replace. Its a toss up about chroming axles, they are a precision fit and if the chrome gets to them they will probably be to tight for the bearings when they come back. We will go with a new set of stainless axles in their place. | ||
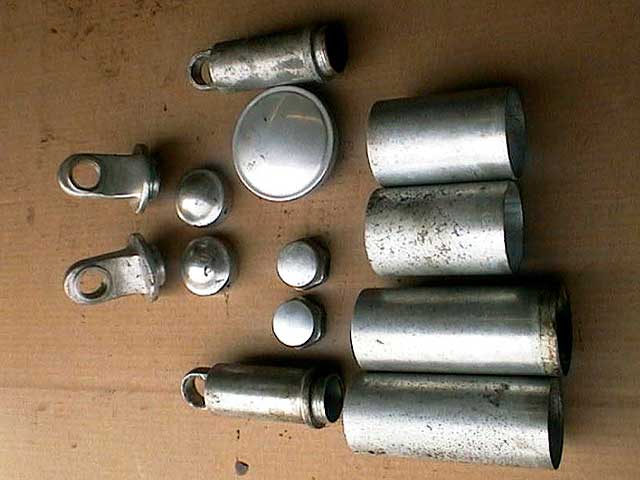 |
These aluminum parts are in good condition. Aluminum polishing costs much less than chrome so we will send these parts to the polisher. Don't bother polishing any part that has a dent in it, the defect will only be magnified when it gets polished. | ||
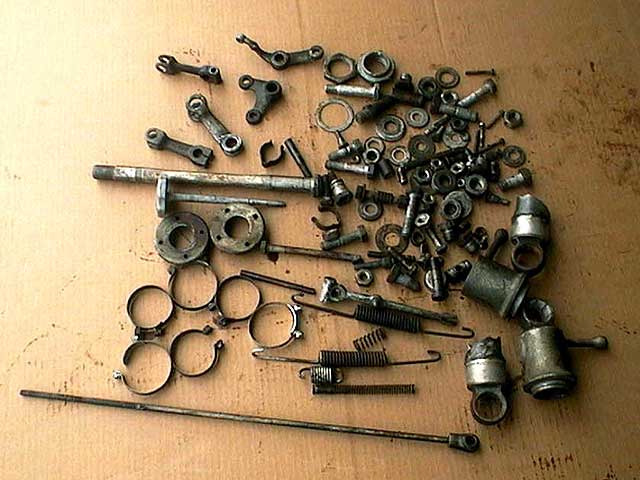 |
Here's a photo of the parts we will be sending out for cad plating, its basically all the steel parts that have the dull silver finish. Cad plating is very inexpensive if you do the prep work yourself. Each part must be bead blasted perfectly clean and free of the old plating, be sure to dress any buggered parts with a file before blasting. If the holes in your wheel seal nuts are elongated you can drill them oversize and they will look new again. Do not use cad plating that is only acid dipped, if you want the best possible finish its worth the effort to bead blast the parts first. | ||
 |
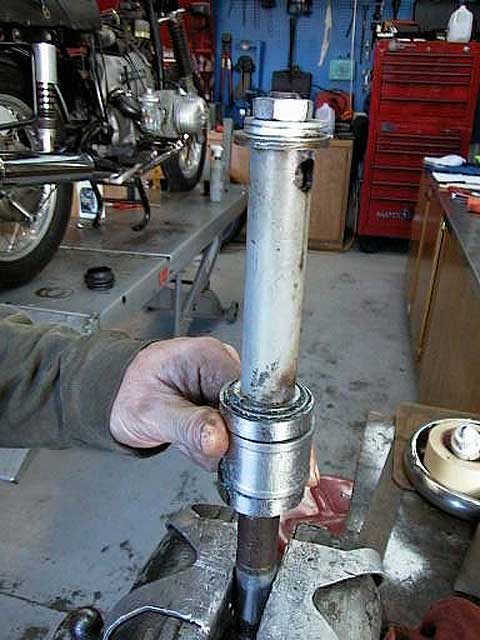
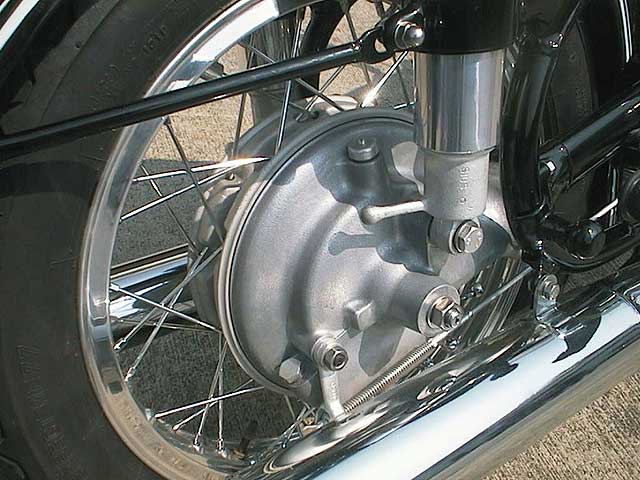
The shocks have leaked some oil and they are old, our bike will get new shocks front and rear. These are not easy parts to replace so its best to change them for new if you want to do the job right the first time. | ||
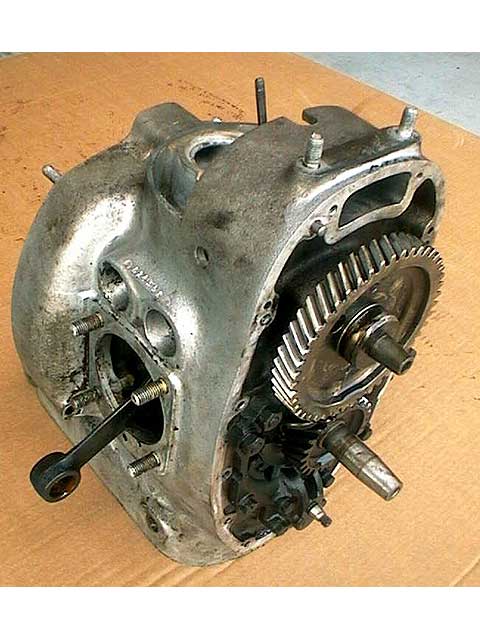 |
Here's our engine block, the timing gears are perfect and the crank looks good so far. We will know more when we get it completely disassembled. | ||
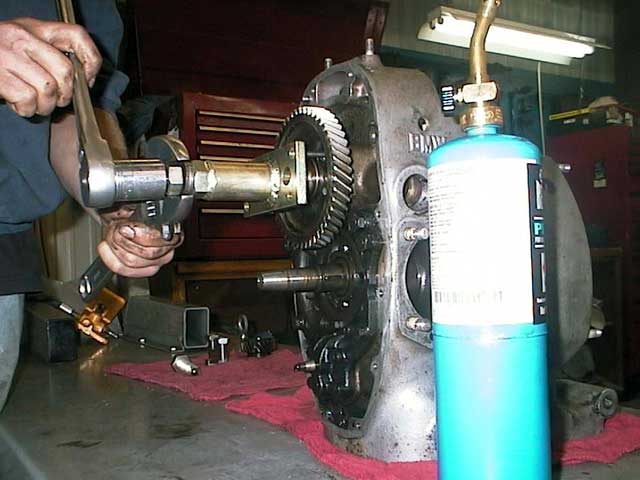 |
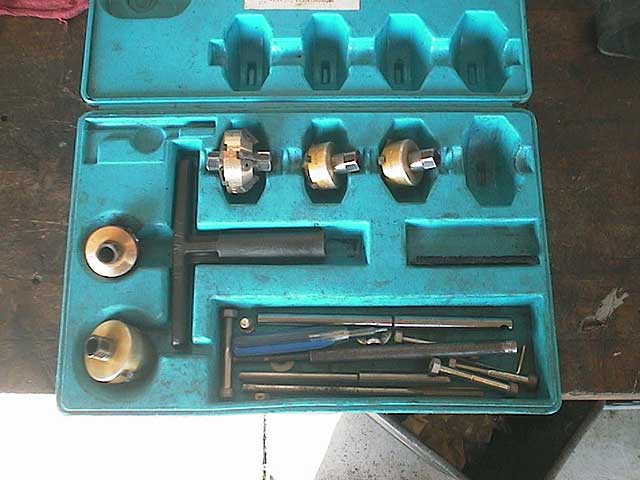
Today we will be removing the crankshaft and camshaft front the R60/2 engine block. We will start will Ed Korn's Many in One Tool, this tool provides a way to pull the timing gears, gear covers and main bearings, as you will see. Price of the tool is about $250. | ||
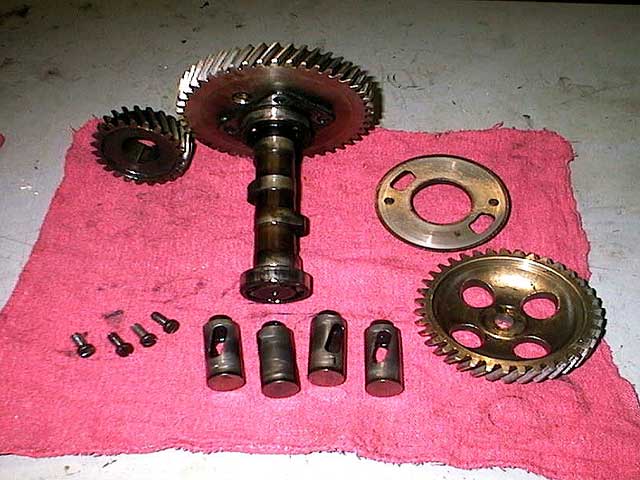 |
First we remove the camshaft with the cam gear attached, we also inspect the lifters and oil pump gear. It is common for the lifters to have small pits on their face where they contact he cam lobe. If the lifters are pitted of cracked they should be replaced. Also check side play of the lifter in its bore, if you can wiggle them side to side you must rebush the lifter bore. This engine had four perfect lifters so we won't need to replace any parts here. Also check the timing gear teeth for pits or unusual wear. These gears are in matched sets and individually sized to each block, do not mix and match timing gears, if they are bad you will have to replace them as a set and its expensive! We are happy to see that this set is fine. The round slotted disc is the crank case breather valve, as it rotates it opens a passage to allow the crank case gasses to escape, this allows the engine to maintain optimum crankcase pressure as the pistons move up and down in their bore. The face of the breather valve must be smooth to insure a good seal, this part seldom wears out | ||
 |
Now we use our puller tool to remove the crank shaft timing gear from the crank.This gear is a tight press fit so it helps if you heat the gear with a propane torch to 220 degrees, hot enough to fry spit but not so hot as to damage the temper of the steel. | ||
 |
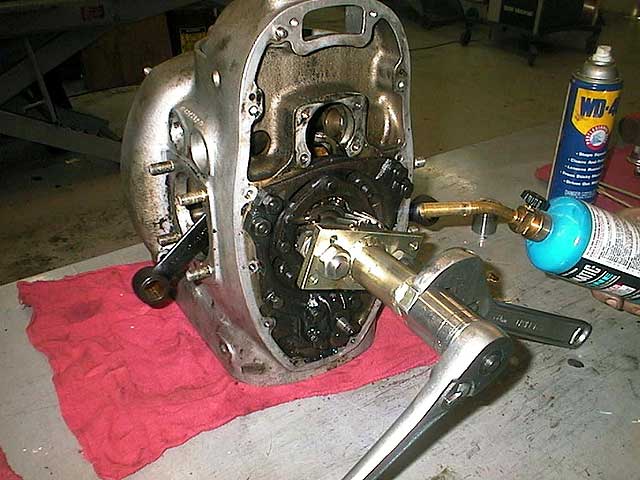
The front bearing support has been removed after we pulled the timing gear. Next remove the two slinger ring screws and take out the slinger ring. Heat the rear bearing support and lightly tap the crank forward from the rear, the rear main bearing and crank will slide forward and hang loose in the block. Now rotate the crank until the front crank web is facing upward. Now lift up on the front of the crank and pull the crank out of the case. This is a real jig-saw puzzle but it goes easy. It's hard to imagine how they designed this on paper before the advent of computers. The Germans were pretty smart! | ||
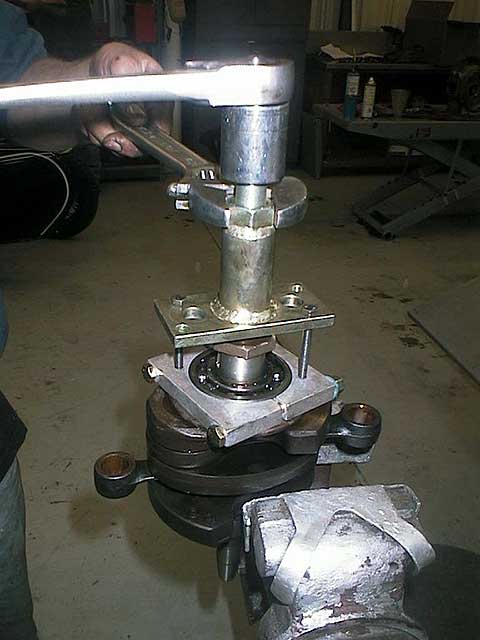 |
When the Crank is removed you are ready to pull the rear main bearing, again we use Ed's many in one tool, first heat the bearing as you don't want to remove any material from the crank journal. We always replace the main bearings, these parts are relatively inexpensive and the do sometimes fail. Do not just use any bearing from you local bearing supply, while all replacement bearings are the same size, they are all not the same.They have differing types of ball cages and they are made to differing degrees of precision. Buy your main bearings from a reputable source with BMW motorcycle experience, or by genuine BMW parts. | ||
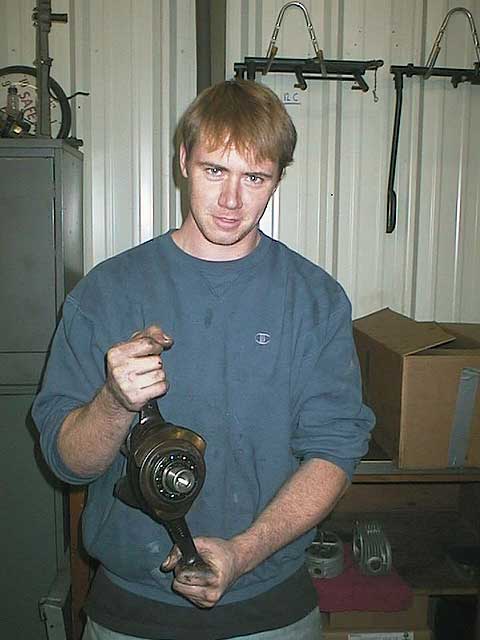 |
We promised Adam we would take a picture of him with his "crank in hand". Here he is! If the connecting rods have more than .0004 inch axial play they will have to be rebuilt with new bearings. Blue Moon provides rebuilt crank shafts on exchange if this is the case. | ||
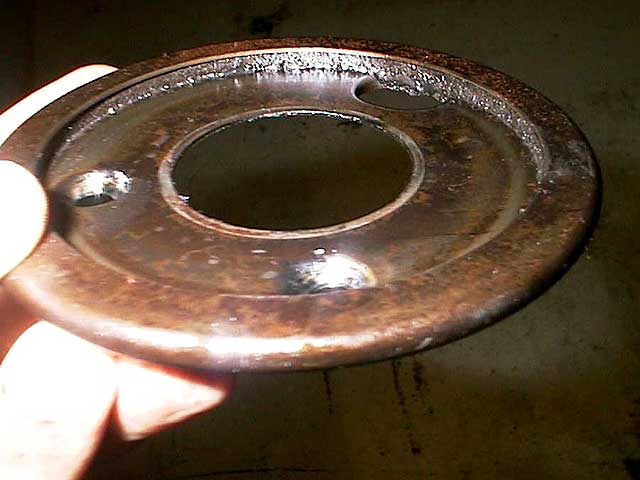 |
Here's a close up of one of the two slinger rings. As you can see it is totally full of hard caked sludge. This material is a combination of aluminum and steel and bronze from the normal wear and tear of the engine internal parts. Its all packed together with carbon from the combustion gasses and old motor oil. You can pick it out with a sharp metal pick or you can sand blast it out but that takes time. We will throw ours away and replace it with a new slinger ring. How can you tell if your slingers are full? answer is "you can't". The only way to know is complete disassembly of the engine You will save the cost of a crankshaft rebuild if you catch it it time. Wait too long and the clogged passage shuts of oil supply to the rod bearings causing an audible knock followed by a loud knock, followed by a long walk home. | ||
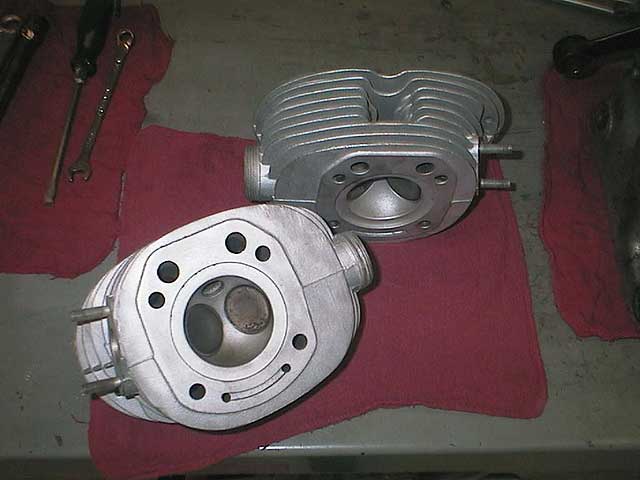 |
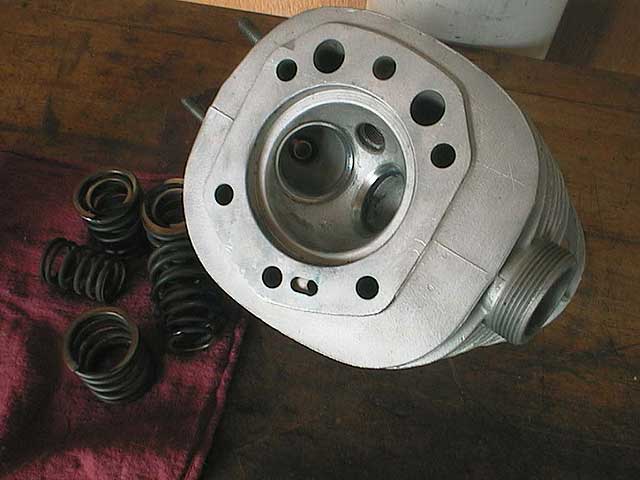
Our cylinder heads cleaned up nicely in the bead blaster, one of the exhaust threads is stripped so it goes to our machinist for heliarc and rethreading. | ||
 |
Today we will perform a 3 angle cut on the valve seats using the Neway valve cutting tool set. I have performed hundreds of valve jobs over the years with this simple set of Neway cutting tools. This kit will do any BMW air head as well as many other motorcycles. I have also used this tool on my 1947 Studebaker and my 1937 Cadillac. The Neway kit consists of various cutting heads, different sized pilot rods, and a T handle. | ||
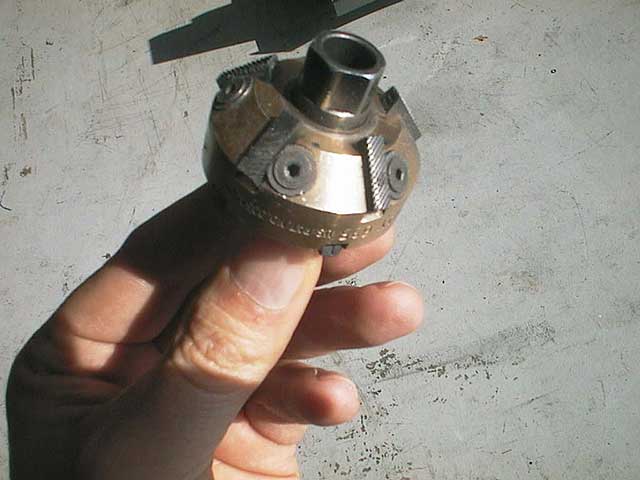 |
Here you can see the cutting head had adjustable carbide teeth seat at the desired angle, these teeth are still cutting good after years of use. | ||
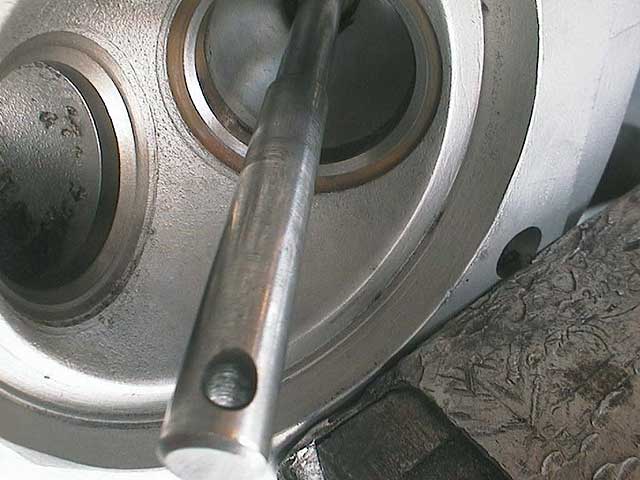 |
The pilot rod has a very slight taper so it is held firm in the guide. | ||
 |
After new valve guides are installed the valve seat is cut to 30 degrees,45 degrees, and 75 degrees. It is important that the valve head contact the seat precisely to insure a good seal and a long lasting cooling running motor. When the tool is set up to cut, it only takes a few twists of the wrist to renew the sealing surface. | ||
 |
The intake seat now has a new three angle cut. Up to now we have only cut the 45 degree angle on the exhaust seat. | ||
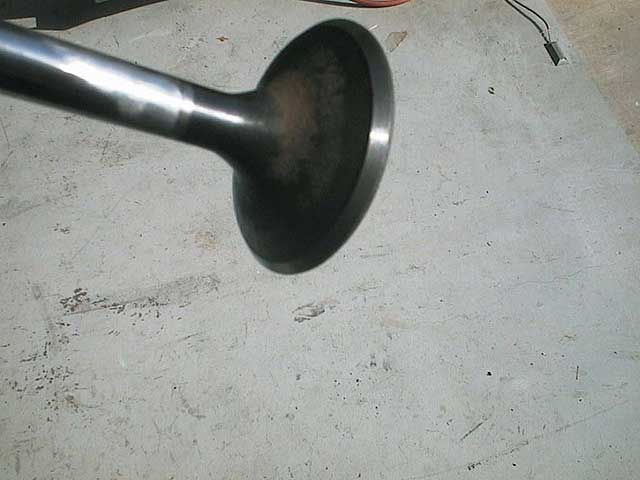 |
This the the vale after the sealing face has been cut at 45 degrees. Your local auto parts store can do this for just a couple bucks. | ||
 |
We us a special 2 stage 8 mm reamers to size the valve guide. Be sure to use a reamer that is designed to cut the soft bronze valve guides. | ||
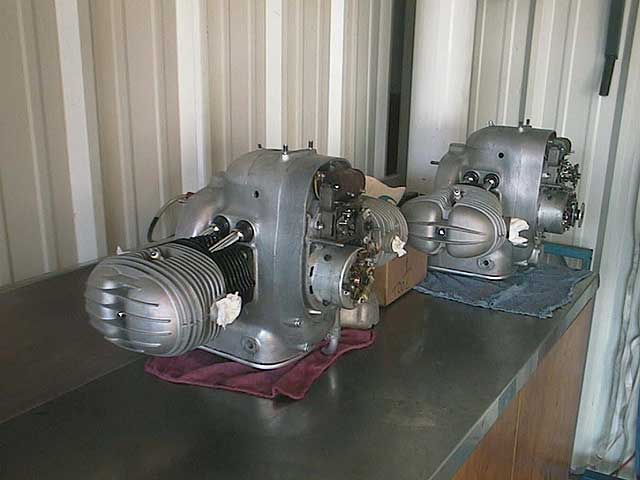 |
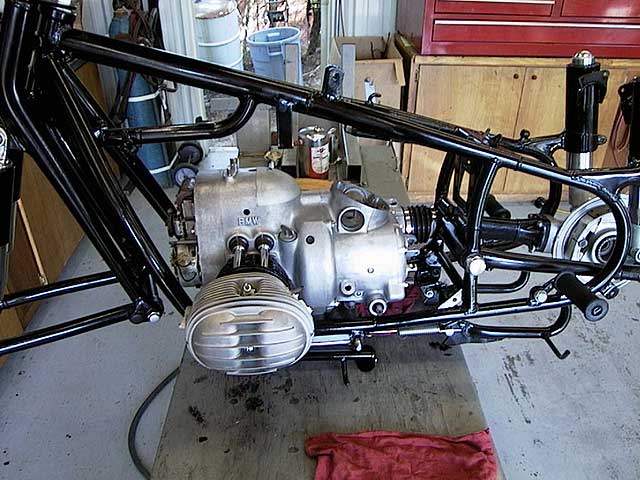
Our R60 motor is now assembled. | ||
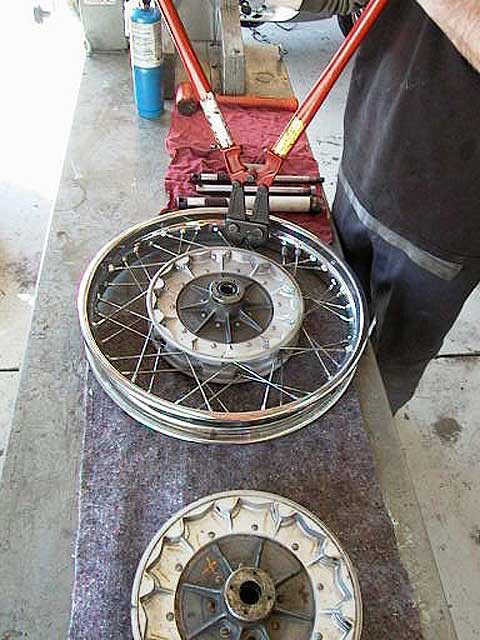 |
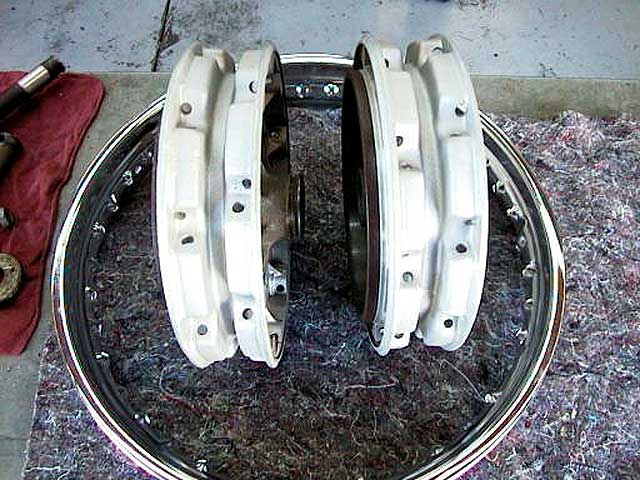
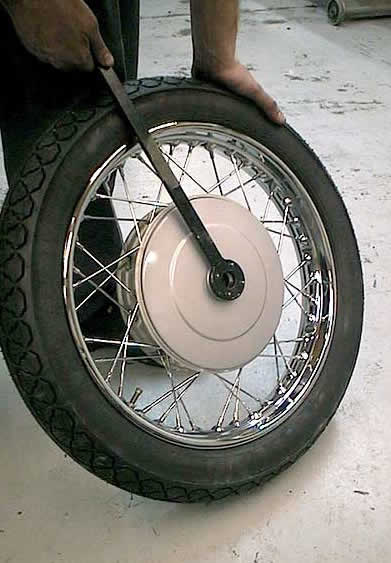
Next we will build a set of wheels with new chrome rims and spokes. The first thing after removing the tire is to cut the old spokes out of the rim, this can best be accomplished with a bolt cutter. There is no point in saving the old spokes and nipples, cut them up and toss em. Do be sure to save the square brass spoke plates as these are expensive and reusable. Chrome shops charge over $200 per wheel to plate a rim, you will save money by simply replacing your rims. Aluminum rims can be polished if they are not heavily pitted, be sure your rim is straight before e you send it out for polishing. | ||
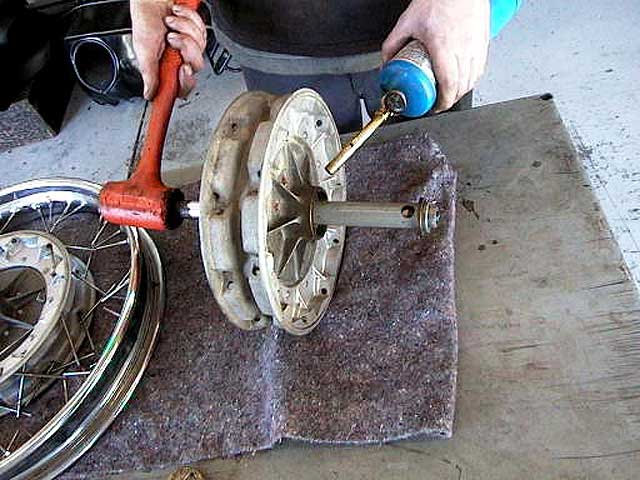 |
Follow the shop manual to inspect your wheel bearings,you can use your axle and a home made pipe spacer to hold the bearings in alignment while tapping them out. Always use heat when removing wheel bearings. After cleaning, inspect the bearing races for small pits or rust,replace any questionable bearing, pack them with a good quality wheel bearing grease. | ||
 |
If a bearing is replaced the assembly will have to be re-shimmed, you want minimal free play with no binding when the axle nut is torqued. Test the bearing fit before the bearings are installed in the wheel. You really don't need a full set of bearing shims to do this job but you will need a lathe to cut the spacer to size. | ||
 |
We have given our wheel hubs the bead blast treatment and they are now ready for the bearings to be installed, along with new seals, Some times I clear coat the freshly blasted hubs with urethane clear. The hubs will stay cleaner and not oxidize but the look will be somewhat different from original. | ||
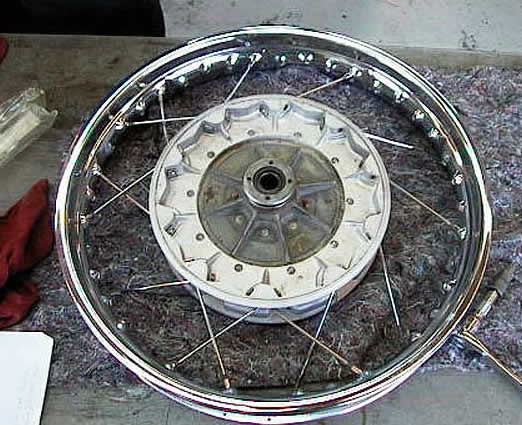 |
Today we will build a set of wheels with new chrome rims and spokes. The first thing after removing the tire is to cut the old spokes out of the rim, this can best be accomplished with a bolt cutter. There is no point in saving the old spokes and nipples, cut them up and toss em. Do be sure to save the square brass spoke plates as these are expensive and reusable. Chrome shops charge over $200 per wheel to plate a rim, you will save money by simply replacing your rims. Aluminum rims can be polished if they are not heavily pitted, be sure your rim is straight before e you send it out for polishing. Follow the shop manual to inspect your wheel bearings,you can use your axle and a home made pipe spacer to hold the bearings in alignment while tapping them out. Always use heat when removing wheel bearings. After cleaning, inspect the bearing races for small pits or rust,replace any questionable bearing, pack them with a good quality wheel bearing grease. If a bearing is replaced the assembly will have to be re-shimmed, you want minimal free play with no binding when the axle nut is torqued. Test the bearing fit before the bearings are installed in the wheel. You really don't need a full set of bearing shims to do this job but you will need a lathe to cut the spacer to size. We have given our wheel hubs the bead blast treatment and they are now ready for the bearings to be installed, along with new seals, Some times I clear coat the freshly blasted hubs with urethane clear. The hubs will stay cleaner and not oxidize but the look will be somewhat different from original. There's a myth about wheel lacing being a "magic" science and a lost art. Its really quite simple, the BMW wheel hub directs the spokes for you,the wheel will only go together one way. If this is your first wheel lacing experience do just one wheel at a time so you always have an assembled wheel to refer to. It is important to note that these rims have a left side and a right side, basically you must put an inside spoke to an inside nipple and and outside spoke to an outside nipple.If the spokes interfere with each other where they cross try flipping the rim over. BMW spokes use a 4mm nipple, some after market spokes, such as Buchanan's use a 5mm nipple, these larger nipples can present a problem when trying to lace them to a stock rim. I suggest you get your rims and your spokes from the same source. Its a good idea to use anti seize compound on the spoke threads,especially if you are using stainless spokes. Personally I prefer chrome plated spokes as they are brighter and moreauthentic. | ||
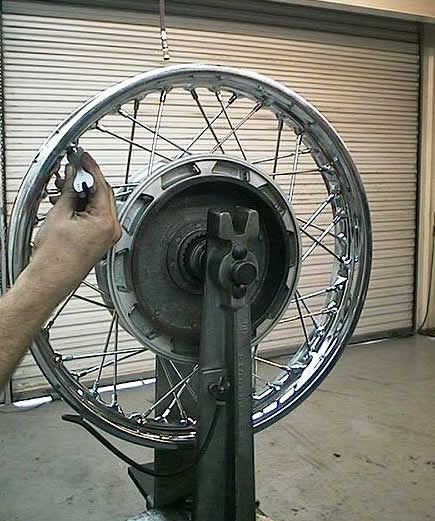 |
After the wheel is laced and all spokes are finger tight it is time to start the lacing process. First you want to note the rim offset. You can measure this on your other wheel that you haven't dissembled, its the sideways distance from the edge of the rim to the edge of the brake drum use a straight edge a ruler to determine the off set. Now begin snugging the spokes using a proper spoke wrench. You want do do each spoke about a quarter turn at a time ,always adjusting for the "run out" and the "side to side" distance. A little practice and you will get the hang of it. Continue this process until all the spokes are tight and the rim spins true. You can tap on each spoke with the wrench to hear if they ring.A dead sound is a loose spoke. By the way you don't need a fancy truing stand, the earls fork swing arm will make a fine stand. It is not difficult to lace and true BMW wheels,anyone can do it with a little patience and practice. | ||
 |
Use the special wheel nut pin wrench when tightening or loosening the wheel nuts it will save your nuts from damage. I always replace the hub caps with new ones, these are relatively inexpensive and they look great. Of course I should tell you Blue Moon Cycle sells the parts and tools required to build your wheels right.Or put your crusty wheels in a box and send them to us,in a few days they will come back looking like new | ||
 |
 |
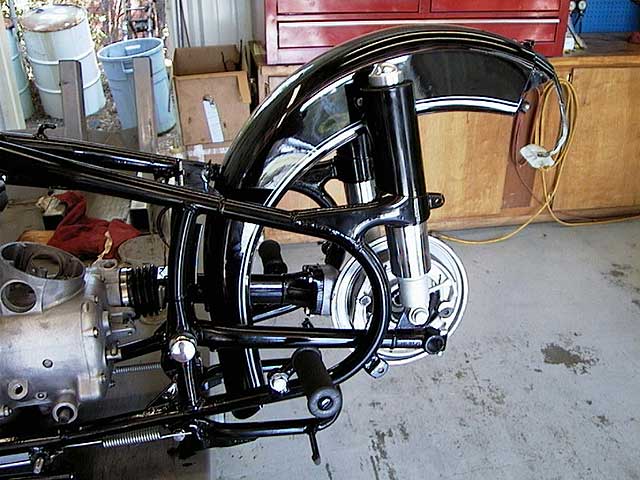
I prefer to powder coat the frame and small parts, Powder is much more durable than paint and if done properly it looks the same as paint.Our powder coated frame and forks are assembled and the power train is installed, We like to get the engine in the frame first, then assemble the rolling chassis but either way works, use masking tape to protect the components as they are going together. All sheet metal parts get a base coat clear coat with hand applied pinstripe over the clear. If you don,t have an original on hand for reference take several photos of the stripes before stripping so your striper will know how to apply the stripes, its almost guaranteed he won't get them right unless he has a good example to copy. | |
 |
 |
We replace front and rear swing arm bearings and we install a new set of taper roller bearings in the fork neck. A new set of European low handle bars and all new cables and all new rubber parts. We are also using our stainless steel bolt kit on this bike, they look great and make assembly time faster. If you are going for a concurs 100 point restoration you will want to use all the original bolts with new cad plating. | |
 |
 |
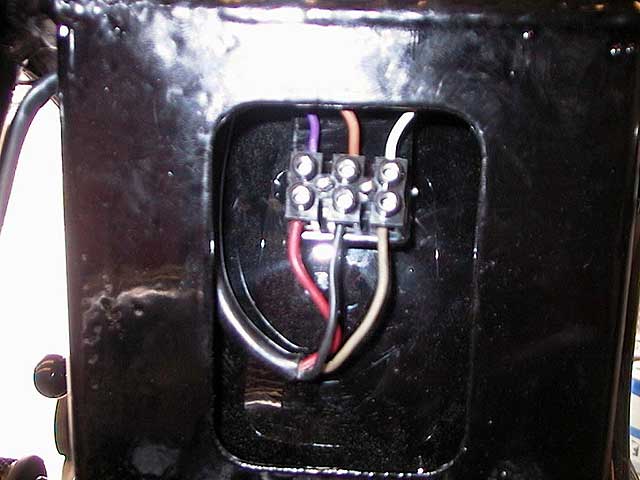 |
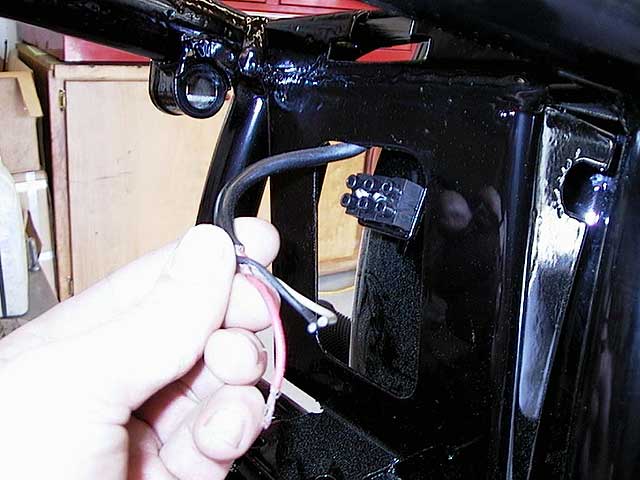
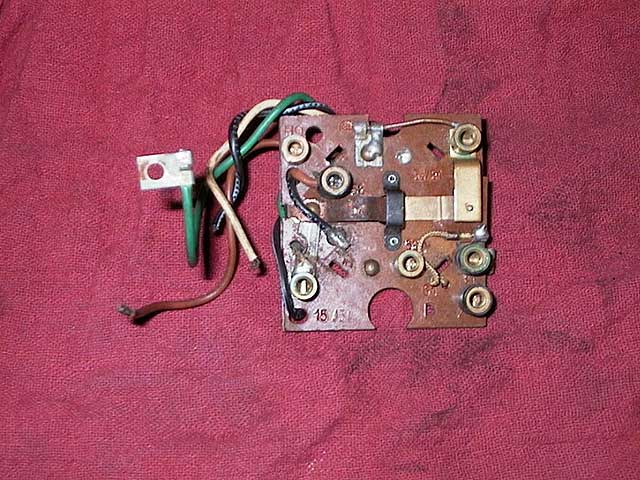
Since this is not a technical article we will breeze thru the electrical details. The BMW wire harness is super simple it only contains about ten wires and they are color coded. Start at the headlight and work your way back, the /2 owners manual has an excellent wire schematic in case you get lost. Its best to photograph the wire harness before disassembly so you know the correct routing, this is not laid out in any manual. We had a good terminal board but the wire harness is being replaced with a new one. The terminal block for the tail light usually gets rusty, a new one is cheap insurance against future problems. I hate to see nylon wire ties on a vintage bike, All visible wire ties should be like the original metal strap ties.Bar end blinkers by Hella are a nice period accessories and a unique item for German bikes, consider a set at this time. Your battery should have a removable lid like the original, stay away from the Yuasa battery, it works fine but looks like crap. |
 |
 |
 |
We only need to clean and lubricate the speedometer, new chrome bezel rims are available and can be crimped on by hand with a screw driver. I do not recommend you zero the mileage, its better to preserve the history of bike by keeping the odometer mileage original to the bike. |
 |
 |
 |
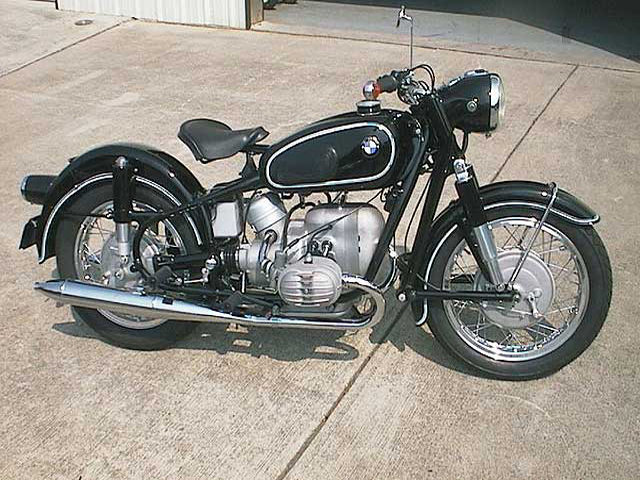
We have completed assembly of our R60/2 restoration project. As you can see the bike is stunning. I especially like the solo seat and alloy wheels. We tried to stay as close to stock as possible. The elegance of the BMW design is not enhanced with extra chrome or gaudy accessories, even the small tank looks perfect on this bike. We will paint the battery black so it looks more authentic. After a little fine tuning the bike purrs like a kitten. We will treat it like a new bike, with 500 easy miles followed by an oil change an valve adjustment. Steering head bearings should also be snugged and brakes adjusted after some break in miles. These mid 60's BMW's are truly a pleasure to ride, smooth and quiet, the quality is obvious. Take a another look at episode 1 as you can see we turned back the clock and erased 40 years of neglect. It is very rewarding to own and ride a motorcycle you restored yourself. I would encourage anyone with the desire to restore a motorcycle to go for it. If the bike you decide to restore is a BMW keep us in mind. We are always available with parts and technical expertise to help you complete your project. Happy riding and wrenching.John Landstrom |
 |
 |
 |
|
 |
 |
 |
|
©2009 Blue Moon Cycle |
|